
Rigging Fun and Documentation for BYU's Student Film for the Senior class of 2015.
Saturday, February 22, 2014

Friday, February 21, 2014
Maya 2012 Hypershade Craziness
Hey guys! There is a weird bug in 2012 where it the connection editor won't show outputs. Luckily, there is a fairly simple solution. You just have to put the outputs in the right hand side of the connection editor.


Doesn't Work. No Outputs. Works! Has Outputs!
Hope yall don't run into this problem, but if you do, remember go from right to left! Thanks Maya!
Thursday, February 20, 2014
Rambo Layout Rig
Hey Guys!
This morning I knocked out the rambo rig for previz. It is super basic, but it will get the job done. It has reverse feet, which are way cool. The rig is in the rigging folder in Ram's Horn.

This morning I knocked out the rambo rig for previz. It is super basic, but it will get the job done. It has reverse feet, which are way cool. The rig is in the rigging folder in Ram's Horn.
Tuesday, February 18, 2014
Fail Faster
This is a short weekly video talking about game development, and his week's theme talks about something important that I learned at Pixar.
Failing Faster
Don't be afraid to dig in.
Failing Faster
Don't be afraid to dig in.
Sunday, February 16, 2014
Experiments
In attempting to recreate Brian Tindall's deformation system, I've been trying a few things that are available to us in Maya to get things to function similar to how its done at Pixar.


Three Curve Principle using Blend Shapes - All three of the small curves add up to the one circular shape you see here. Blend Shapes can also be pushed PAST their value of 0 to 1. For example, the bottom image shows the Overall Blend Shape hitting a -1. These can be pushed past the default values, but it's hard to do such without a set driven key or manually inputting the value.

Curve Driven joint movement is a tasty thought. Pixar often uses Curve "patches" to influence their movers to deform a certain manner. In this case, I wanted a joint to travel up and around the skull, and down and forward, instead of the linear motion a blend shape would give you. I first made a spline curve in the side view.

If you remember the video about the PointOnCurveInfo Node in Maya, it seems there might be an alternative to modifying a node network from placing an object on a motion path. In this case, I placed the Null Object (locator) on the path to animate, then broke the keyframe connection in the channel box so it was no longer dependent on the timeline.

To prevent weird transforms, I first connected the alltransforms attribute of the motion path to the translate attribute of the locator. Next, I deleted the extra addDoubleLinear Nodes to clean it up.
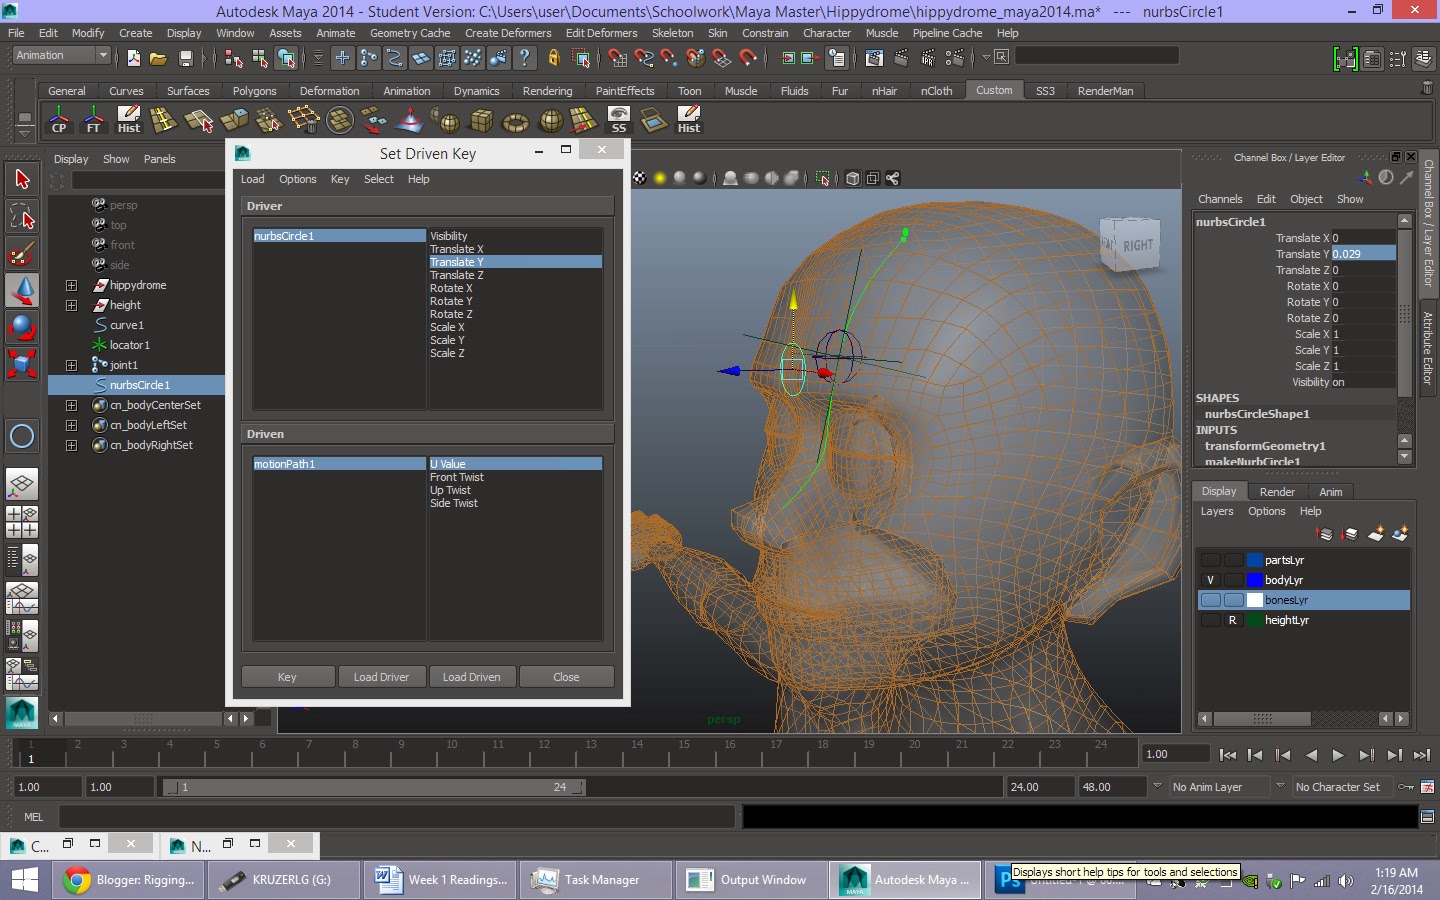
I then parent constrained a joint to the locator, and made a control. Using a SDK (set driven key) I had the Control Object Drive the U Value of the Motion Path Node. 0 at the top, 1 at the very end.


Basic weight painting on the head tied the joint to the eyebrow region. The joint now travels along a specified path that I can change anytime. Just grab the CVs of the curve and your joint path will change, affecting how the geometry movies across the face. This is an exaggerated effect so you see how it works.

I wanted to see if the verts on a mesh could have a weight of "1" for two or more joints. I don't think they can. The layered approach would be this: The mesh to be manipulated has no joints in it. I have two blend shapes that are being actively driven by joints. Turns out ONE joint CAN be influencing two meshes at a time. Interesting. In this image, the blend targets are being combined into the final shape on the left.
Friday, February 14, 2014
Bendy Joint Plus IKFK Switch
K guys. It is official. It works!!
I have been putting off checking this cause I thought it would take forever, but turns out, everything already works. Just set up your ikfk rig. When you have it where you want it just apply bendy joints and whala!
I have been putting off checking this cause I thought it would take forever, but turns out, everything already works. Just set up your ikfk rig. When you have it where you want it just apply bendy joints and whala!
Stop Staring RULES!
So I was rereading a section of stop staring 3 and I actually understood it! That was so amazing that I had to share. It was about buffernodes and your network when you are setting up your rig. Buffernode setups allow you to have layers of control. It makes it so if your animator wants, he can go attribute by attribute to create his animation, or he can use your widgets and controls, etc. Cool stuff.
Example, on a lip sync with a buffer node, your animator could move every blend shape, he could move your controls that create visemes, or he could move controls that create phonemes. 3 layers of control.
Example, on a lip sync with a buffer node, your animator could move every blend shape, he could move your controls that create visemes, or he could move controls that create phonemes. 3 layers of control.
Subscribe to:
Posts (Atom)