

Rigging Fun and Documentation for BYU's Student Film for the Senior class of 2015.
Friday, February 28, 2014
Layered Deformation
While testing out making the BrowUD of Hippydrome, (which was super successful, I rigged a cluster to translate on a curve) I made sure our method would work in a layer based format, meaning the deformation order allows us to add a cartoony lattice to the head, but without affecting the movement of points on the mesh. Enjoy.
Basic Avar visual layout
A visual layout of how a basic avar is hooked up. It probably makes no sense and I will eventually revamp this for you. This just mentions some pointers I wanted to remember while I was testing things out.

Broad Instruction for building an Avar
I've been tinkering a lot with Clusters, the Component Editor, weighting methods, and other tests to see if this idea will work. Basically we are going to be using weighted clusters to get the main movements of our faces. Using our new way of weighting (rather than painting, dialing down points rows at a time) we will be able to create great movement, but then on TOP of that add sculpts that will add or subtract volume as needed. This way our characters will feel nice and fleshy - which is exactly what studios want to see from us. This should make enough sense to you guys. Don't worry if it doesn't cause we're going to hit it hard on Monday at dailies.


Wednesday, February 26, 2014
Osipa Gui Troubles Maya 2012
Hey Guys!
In an effort to figure out some nice gui's for the face I discovered that maya hypershade is the worst. It is EXTREMELY hard to hook things up nicely, and in the end I couldn't figure it out.
I did find a rig online that has an osipa facial gui that he created with expressions though. Here it is.Blake Rig
Monday, February 24, 2014
Comet Scripts
Michael Comet is one of the most revered riggers in the industry. He is
currently the head of Rigging for The Good Dinosaur at Pixar and was a
really friendly, knowledgeable guy.
He has an old webpage that has some fun assets. I came across it when several rigging videos mentioned it. I was like WHOOOAAAAHH I met this guy!
Comet Scripts
We might be using these a lot so take a look at some of them and try them out, please.
He has an old webpage that has some fun assets. I came across it when several rigging videos mentioned it. I was like WHOOOAAAAHH I met this guy!
Comet Scripts
We might be using these a lot so take a look at some of them and try them out, please.
Master Rigging Thoughts
Well, here are some of the topics that I want to cover with you guys. I learned a lot of things over the weekend and lots of it is valuable to our success in the next two months.
Deadlines
Component Editor and Slider
Display-Polygons-Component IDs-Vertices
Approaches for Curve based deformation in Eye - how should we solve using part of Pixar's theory
Scripting for squash and stretch head
Clusters, Cluster Painting tool
Mirroring Blend Shapes
Paint Nonlinear Weights Tool
Wrap Deformers
JLCollision Deformer used for eyes to fit in skull - can we recreate this?
Installing Studio Library
Art of Moving Points - Big 5, understanding deformation order, zones of the face, Avars and their purpose and naming, macro muscles - volume sculpts and translation of movers, one to one zone, x factor, consistency in controls.
Shift+Ctrl and dragging
walking, growing selection, hiding selection, and sculpting points
Multiple Window Technique for Blends
Secondary Rig
We have seen how the Cenk rig gives us the option to visualize a whole bunch of secondary points to manually adjust right on the face. This is called a Secondary Rig. This part of Stop Staring explains the hierarchal relationships and what you need to do to pin the secondary points to the moving face. These controls are for fine tuning and not broad ranges of motion.


Ram Anatomy
Here are some pictures from the anatomy book Jorge had checked out from the library. Sorry if the pictures are a little fuzzy. Lets keep in mind that we are not trying to emulate muscles for our characters. We want believable (not realistic) movement of the motion for every part of our characters. Lets take caution when rigging up our ram's legs so they behave in a way that is recognizable as a large quadruped.


Saturday, February 22, 2014
Friday, February 21, 2014
Maya 2012 Hypershade Craziness
Hey guys! There is a weird bug in 2012 where it the connection editor won't show outputs. Luckily, there is a fairly simple solution. You just have to put the outputs in the right hand side of the connection editor.


Doesn't Work. No Outputs. Works! Has Outputs!
Hope yall don't run into this problem, but if you do, remember go from right to left! Thanks Maya!
Thursday, February 20, 2014
Rambo Layout Rig
Hey Guys!
This morning I knocked out the rambo rig for previz. It is super basic, but it will get the job done. It has reverse feet, which are way cool. The rig is in the rigging folder in Ram's Horn.

This morning I knocked out the rambo rig for previz. It is super basic, but it will get the job done. It has reverse feet, which are way cool. The rig is in the rigging folder in Ram's Horn.
Tuesday, February 18, 2014
Fail Faster
This is a short weekly video talking about game development, and his week's theme talks about something important that I learned at Pixar.
Failing Faster
Don't be afraid to dig in.
Failing Faster
Don't be afraid to dig in.
Sunday, February 16, 2014
Experiments
In attempting to recreate Brian Tindall's deformation system, I've been trying a few things that are available to us in Maya to get things to function similar to how its done at Pixar.


Three Curve Principle using Blend Shapes - All three of the small curves add up to the one circular shape you see here. Blend Shapes can also be pushed PAST their value of 0 to 1. For example, the bottom image shows the Overall Blend Shape hitting a -1. These can be pushed past the default values, but it's hard to do such without a set driven key or manually inputting the value.

Curve Driven joint movement is a tasty thought. Pixar often uses Curve "patches" to influence their movers to deform a certain manner. In this case, I wanted a joint to travel up and around the skull, and down and forward, instead of the linear motion a blend shape would give you. I first made a spline curve in the side view.

If you remember the video about the PointOnCurveInfo Node in Maya, it seems there might be an alternative to modifying a node network from placing an object on a motion path. In this case, I placed the Null Object (locator) on the path to animate, then broke the keyframe connection in the channel box so it was no longer dependent on the timeline.

To prevent weird transforms, I first connected the alltransforms attribute of the motion path to the translate attribute of the locator. Next, I deleted the extra addDoubleLinear Nodes to clean it up.
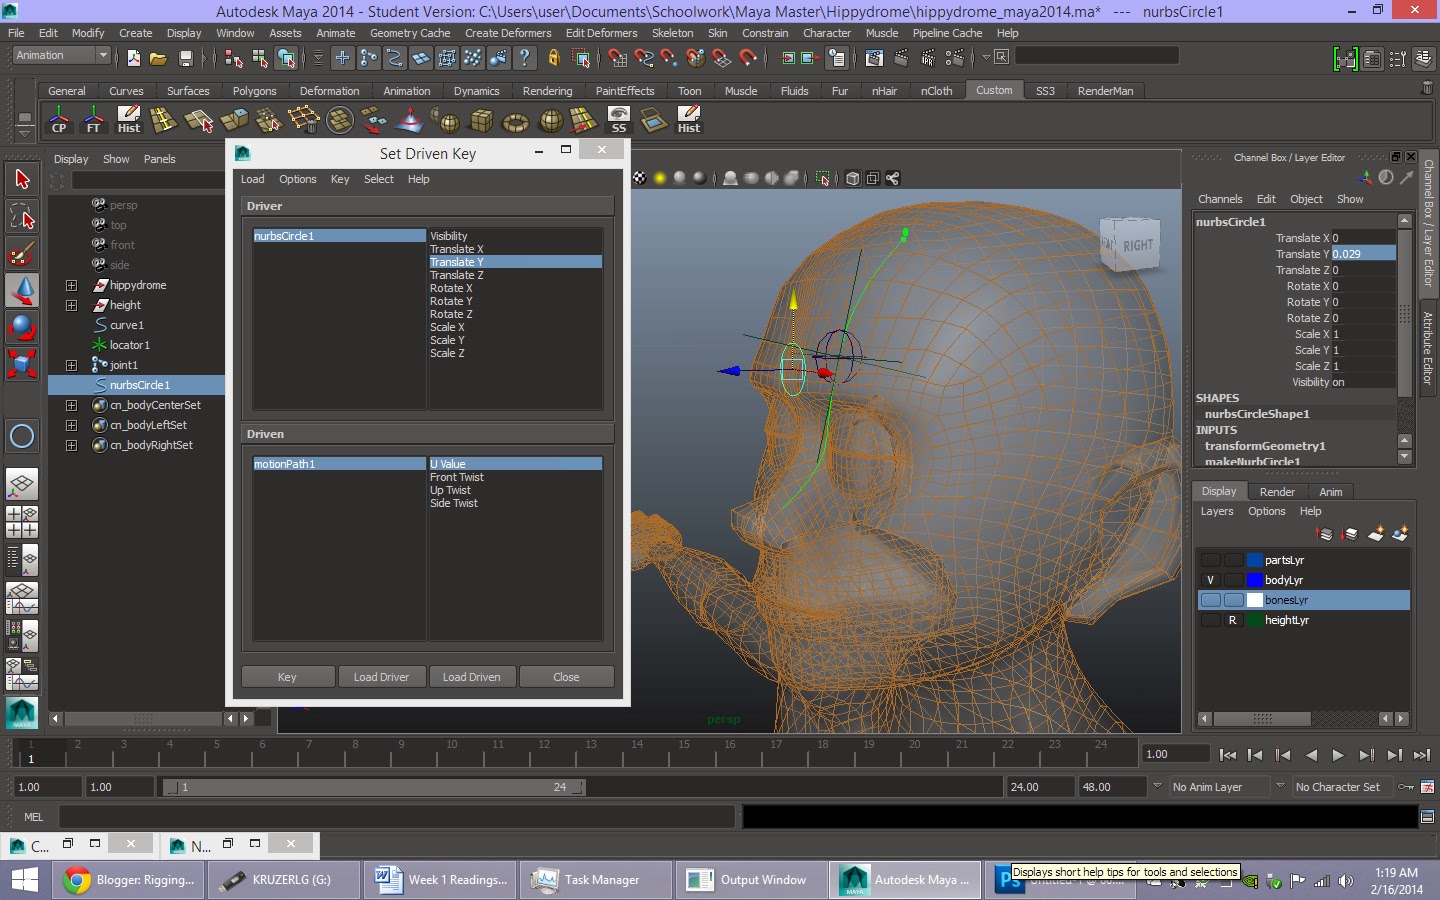
I then parent constrained a joint to the locator, and made a control. Using a SDK (set driven key) I had the Control Object Drive the U Value of the Motion Path Node. 0 at the top, 1 at the very end.


Basic weight painting on the head tied the joint to the eyebrow region. The joint now travels along a specified path that I can change anytime. Just grab the CVs of the curve and your joint path will change, affecting how the geometry movies across the face. This is an exaggerated effect so you see how it works.

I wanted to see if the verts on a mesh could have a weight of "1" for two or more joints. I don't think they can. The layered approach would be this: The mesh to be manipulated has no joints in it. I have two blend shapes that are being actively driven by joints. Turns out ONE joint CAN be influencing two meshes at a time. Interesting. In this image, the blend targets are being combined into the final shape on the left.
Friday, February 14, 2014
Bendy Joint Plus IKFK Switch
K guys. It is official. It works!!
I have been putting off checking this cause I thought it would take forever, but turns out, everything already works. Just set up your ikfk rig. When you have it where you want it just apply bendy joints and whala!
I have been putting off checking this cause I thought it would take forever, but turns out, everything already works. Just set up your ikfk rig. When you have it where you want it just apply bendy joints and whala!
Stop Staring RULES!
So I was rereading a section of stop staring 3 and I actually understood it! That was so amazing that I had to share. It was about buffernodes and your network when you are setting up your rig. Buffernode setups allow you to have layers of control. It makes it so if your animator wants, he can go attribute by attribute to create his animation, or he can use your widgets and controls, etc. Cool stuff.
Example, on a lip sync with a buffer node, your animator could move every blend shape, he could move your controls that create visemes, or he could move controls that create phonemes. 3 layers of control.
Example, on a lip sync with a buffer node, your animator could move every blend shape, he could move your controls that create visemes, or he could move controls that create phonemes. 3 layers of control.
Simple GUI Rigs
This website has a bunch of tips, videos, and scripts that can help in rigging. I found a YouTube video from him that explains how to get really simple GUI rig tools which you can find here.
To save time here is the folder needed for creating the GUI tools. Just open up the document and follow the instructions. I have tested this on both my computer with Maya 2014 and the campus computers. There is a slight problem when using it with the campus computer, but that might just be because I don't fully understand everything.
To save time here is the folder needed for creating the GUI tools. Just open up the document and follow the instructions. I have tested this on both my computer with Maya 2014 and the campus computers. There is a slight problem when using it with the campus computer, but that might just be because I don't fully understand everything.
Thursday, February 13, 2014
Curve Based Joint Movement Solution
Guys I made a major breakthrough here!
Point On Curve Node - Maya SECRETS
A secret node exists that allows us to take an object like a locator or joint and give it a control to animate along a path.
This means CURVE BASED deformations that will allow our joints to travel at a set curve THAT WE DESIGN. This is the SAME principle Pixar follows while setting up their faces in the articulation department. Get STOKED, cause I'm gonna teach you.
By the way I got The Art of Moving Points on my wife's ipad. If you guys want, I can take pictures of each page perhaps and start uploading them for you guys to read. Just tell me if you would like that.
And SUSAN your lattice idea worked perfectly. Select a set of points (verts) and create a lattice deformer - the rest of the object will stay completely intact. This is exactly what we need for the volumetric head.
GUYS IM SO EXCITED!
Tuesday, February 11, 2014
Eyelid rigging
Guys this eyelid tutorial is fantastic. I think this is the way we should do all of our eyes. I don't know how to do this in a modular setup, yet.
Sunday, February 9, 2014
Squirrelly and Gears of War
Jorge posted this on the main blog. It is a cute little rig with some nice functionality.
Also, Jeff (cant remember his last name) pointed me and trevor to a demo reel of Jeremy Ernst. His gears of war rigs have some cool ikfk features.
Also, Jeff (cant remember his last name) pointed me and trevor to a demo reel of Jeremy Ernst. His gears of war rigs have some cool ikfk features.
Thursday, February 6, 2014
IKFK rig
I followed this tutorial to create the ik fk switch. It is extremely useful, and actually quite simple. In short, you create 3 skeletons, your ik, fk, and a bind skeleton. You set them up so that an ikfk switch control will determine which skeleton is effecting the bind. You then make a script that will move and orient your ik fk or fk ik, depending on which you need to move, to the other.
This is the completed file of an arm rig. The script is here.
Once we have completed a leg rig and given it this capability, we can reference it into our modular rig. Woot!
This is the completed file of an arm rig. The script is here.
Once we have completed a leg rig and given it this capability, we can reference it into our modular rig. Woot!
Dailies Notes
1. Blend Tapering - Used to create seamless blends, blend tapering is when you create a blend shape, like a raised eyebrow, and then you turn it into multiple blends. This allows you great flexibility (in, middle, and out control) but when they are all fired it is a perfect blend.
2. Topology Baking - Even after you have created blend shapes you can modify your mesh! baking will transfer all of your edits to the blends.
We also discussed the interface that we want to give the animators, and Stop Staring 3. That book is golden!
Our goal is to create the quality of jill in our rigs.
Monday, February 3, 2014
Topology Changes Applied to Blend Shapes
Blend Shape Tricks!
This easy to follow tutorial explains how to apply topology and model changes across ALL YOUR BLEND SHAPES.
This means we can be making shapes even if the final model is NOT finished. Great news, and not hard to do at all.
This easy to follow tutorial explains how to apply topology and model changes across ALL YOUR BLEND SHAPES.
This means we can be making shapes even if the final model is NOT finished. Great news, and not hard to do at all.
Jane Rig
A guy from Animschool made a very appealing rig based on Jane from Tarzan.
Although it doesn't get too exaggerated, it has pretty appealing movement and he explains some theories he used while building the rig. CHECK IT OUT!
Jane Rig Explained
Although it doesn't get too exaggerated, it has pretty appealing movement and he explains some theories he used while building the rig. CHECK IT OUT!
Jane Rig Explained
Subscribe to:
Posts (Atom)